CASTELLANO
Solía pensar que hacer moldes de silicona y reproducciones en resina era algo complicado y evitaba experimentar con la técnica, hasta que leí de algunos amigos que con estas tecnicas podían reducir figuras y vehículos mas grandes a la escala 1/72 o mas pequeños.
Siempre me sentí atraído por la idea de poder hacer vehículos civiles, especialmente automóviles, pero en la escala en que trabajo 1/72 estos kits son pocos.
Las marcas que hacen automóviles, en general los hacen en 1/64 (o aproximado) y de metal. De modo que no solo no están en escala sino que son de un material muy dificil para trabajar.
Así que la idea de poder transformar un auto de metal a resina, que es un material mas fácil de trabajar (similar al plástico) y ademas de poder reducirlo de 1/64 a 1/72 pudo con mis prejuicios sobre la silicona y la resina y decidí experimentar.
Lo primero que encontré fue que trabajar con estos materiales es realmente fácil y sencillo, al punto que ya mi primer molde y mi primera reproducción salieron bien!!! ademas, el método es realmente económico si consideramos que con un solo molde podemos hacer muchas reproducciones del mismo vehículo.

La teoria de como reducir proporcionalmente un molde de silicona es muy sencilla, si mezclo la silicona con su acelerador y luego le adiciono alguna substancia liquida y volátil que se pueda mezclar con la silicona, al fraguar la silicona la sustancia volatil se ira evaporanado y el molde se ira reduciendo uniformemente.
Estas sutancias volatiles son los solventes y combustibles sobre todo los minerales. Los expertos recomiendan bencina (ques e utiliza para los encendedores) y el aguarras mineral.
Por una cuestion de tener acceso mas facil e decidido utilizar aguarras mineral desodorizada, de la que se puede comprar en cualquier pintureria.
Experiencia, no le digan a sus esposas que van a la pintureria o ella sacara provecho y les hará pintar las rejas o cualquier cosa de la casa.
Experiencia, no le digan a sus esposas que van a la pintureria o ella sacara provecho y les hará pintar las rejas o cualquier cosa de la casa.


ELEMENTOS QUE SE NECESITAN
1) Silicona de dureza 20 y catalizador.
2) Resina poliuretanica. La resina epoxidica (la clasica transparente que llaman "cristal liquido" no es recomendable ya que tarda mucho en curar y por su alta viscocidad deja muchas burbujas).
3) Aguarras MINERAL, desodorizada
4) Pequeña y economica balanza electronica que mida en gramos (yo consegui la mia en una tienda que vende cosas electronicas y celulares a dos cuadras de mi casa), pague por ella 250 pesos .


5) Tres jeringas descartables de 10 cc. Una para el catalizador de la silicona y dos para mezclar las dos partes de la resina.
6) Tres vasos o recipientes descartables y si es posible uno de medicion y resistente al aguarras (los llamados vaso de extravasacion que se usan para cocinar sirven) .
7) Cinta de papel de pintor.
8) Plastilina
9) Carton (cualquier carton semi ipermeable, de una caja de zapatos, de cigarrillos etc)
10) Tijeras o cutter
11) Cyanicrilato
12) Una regla o preferentemente un calibre milimetrico para medicion.
13) Guantes de latex.
PASOS
I) PIEZA MAESTRA
II) CAJA
III) SILICONA Y AGUARRAS
IV) RESINA
I) PIEZA MAESTRA
Preparando el autito para el molde.
I) PIEZA MAESTRA
II) CAJA
III) SILICONA Y AGUARRAS
IV) RESINA
I) PIEZA MAESTRA
Preparando el autito para el molde.
Esta es la parte mas fastidiosa del proyecto.
Mediciones.
Primero escojamos el auto que queremos llevar a escala en resina. En este caso escogí un autito de la marca Hotwheels de los muchos que mi hijo abandono cuando dejo la niñez. El autito estaba muy deteriorado y abollado.
Es importante hacer algunas mediciones.
Primero hay que saber las medidas reales del auto, estas se encuentran facilmente en internet.
En este caso es un Buick Riviera Silver Arrow del 72.
Las medidas a tener en cuenta son, largo, ancho y dsitancia entre ejes. Por una cuestion de comodidad y para facilitar las cosas trabajare solo la distancia entre ejes.
Buick Riveira Silver Arrow 1972 distancia entre ejes : 3099 mm
Con esto calculamos lo que seria la medida de nuestro vehiculo en 1/72.
3099 / 72 : 43 mm
Significa que cuando nuestro molde de silicona se haya reducido hasta una distancia entre ejes de 43 mm tendre que volcar la resina.
Preparando el vehiculo para hacer el molde.


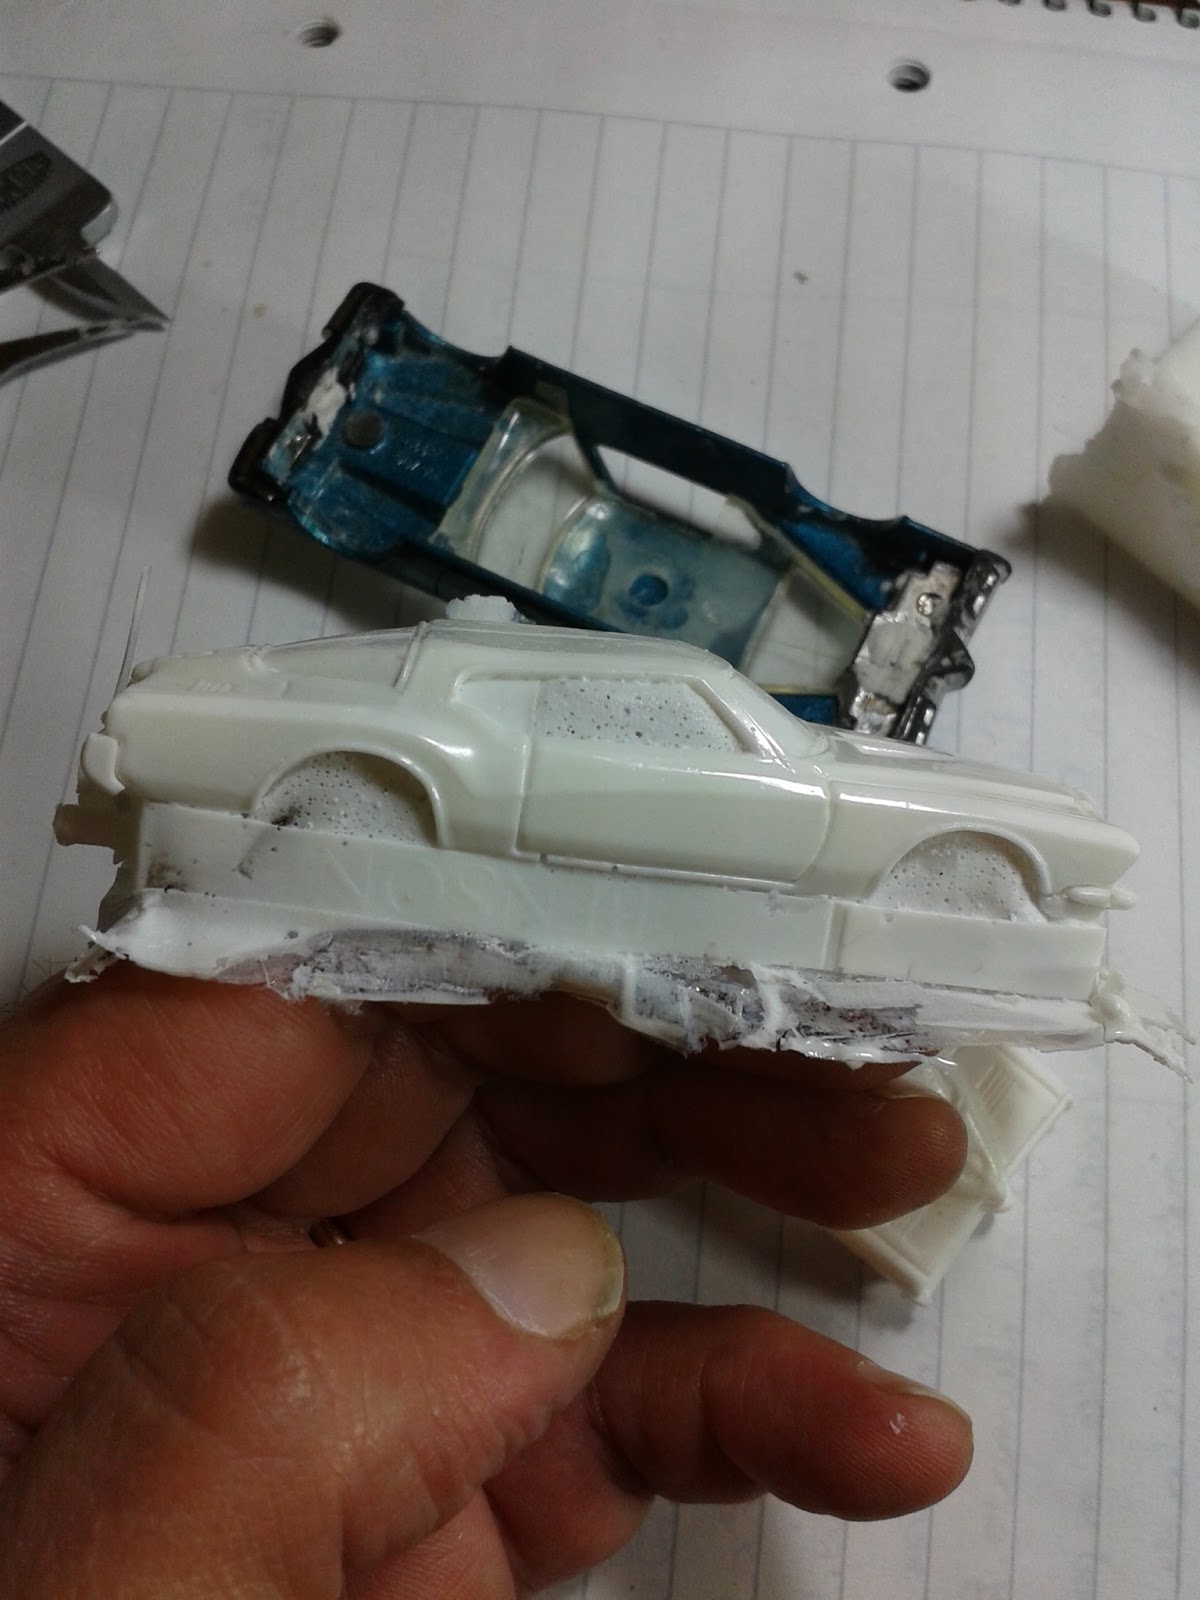
Yo divido estos autitos en tres partes.
a) El chasis, donde van las ruedas.
b) La carcaza donde se incluye el parabrisas y la luneta trasera.
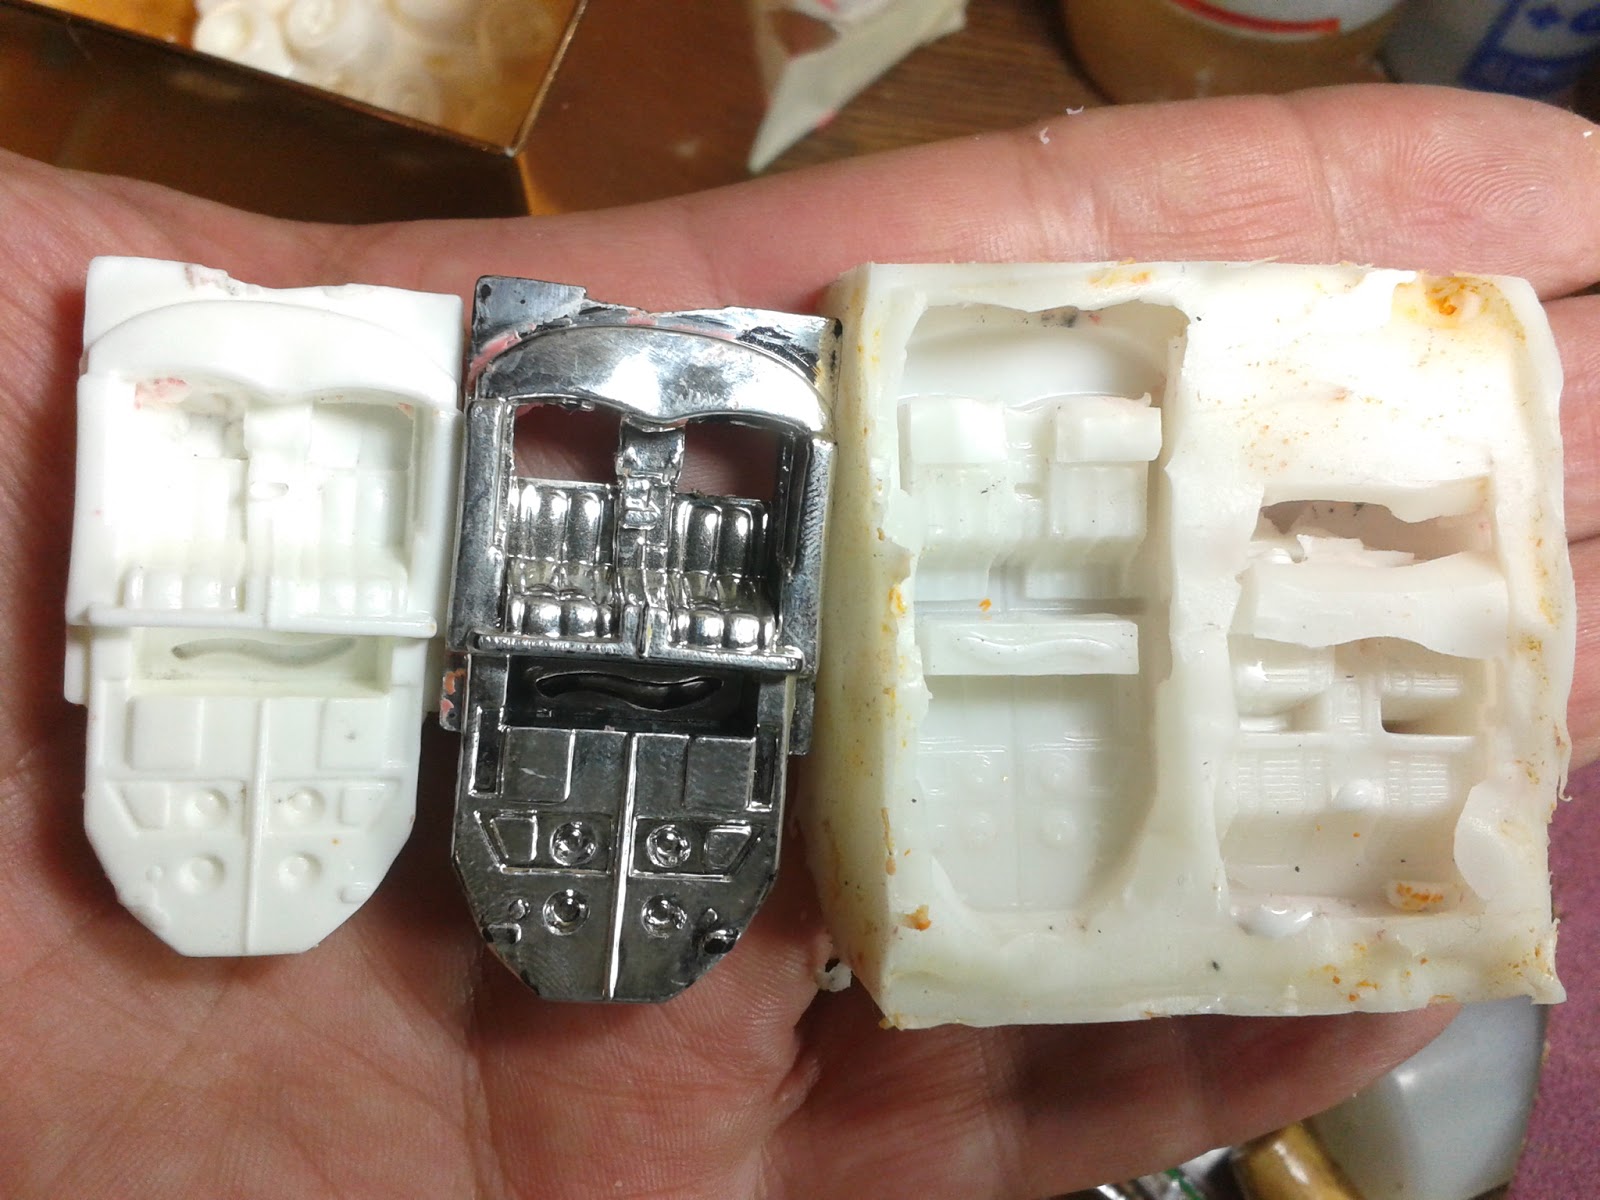
c) El interior con los asientos y el volante.
Lo que quereos reproducir es la carcaza (B)
1) Separo el chasis de la carcasa del autito (la mejor manera es remover los remaches, ya sea con una mecha, un destoonillador o el Dremmel)
2) Puede que algunas partes (ocacionalmente el frente con la parrilla o la parte trasera con las luces o los guardabarros) formen parte del chasis y no de la cracaza, por lo que debemos cortarlos con alguna sierra fina y luego pegarlos con cianocrilato a la carcaza. Si el plastico que forma el parabrisas no esta bien aderido a a la carcaza tambien debemos fijarlo con pegamento.


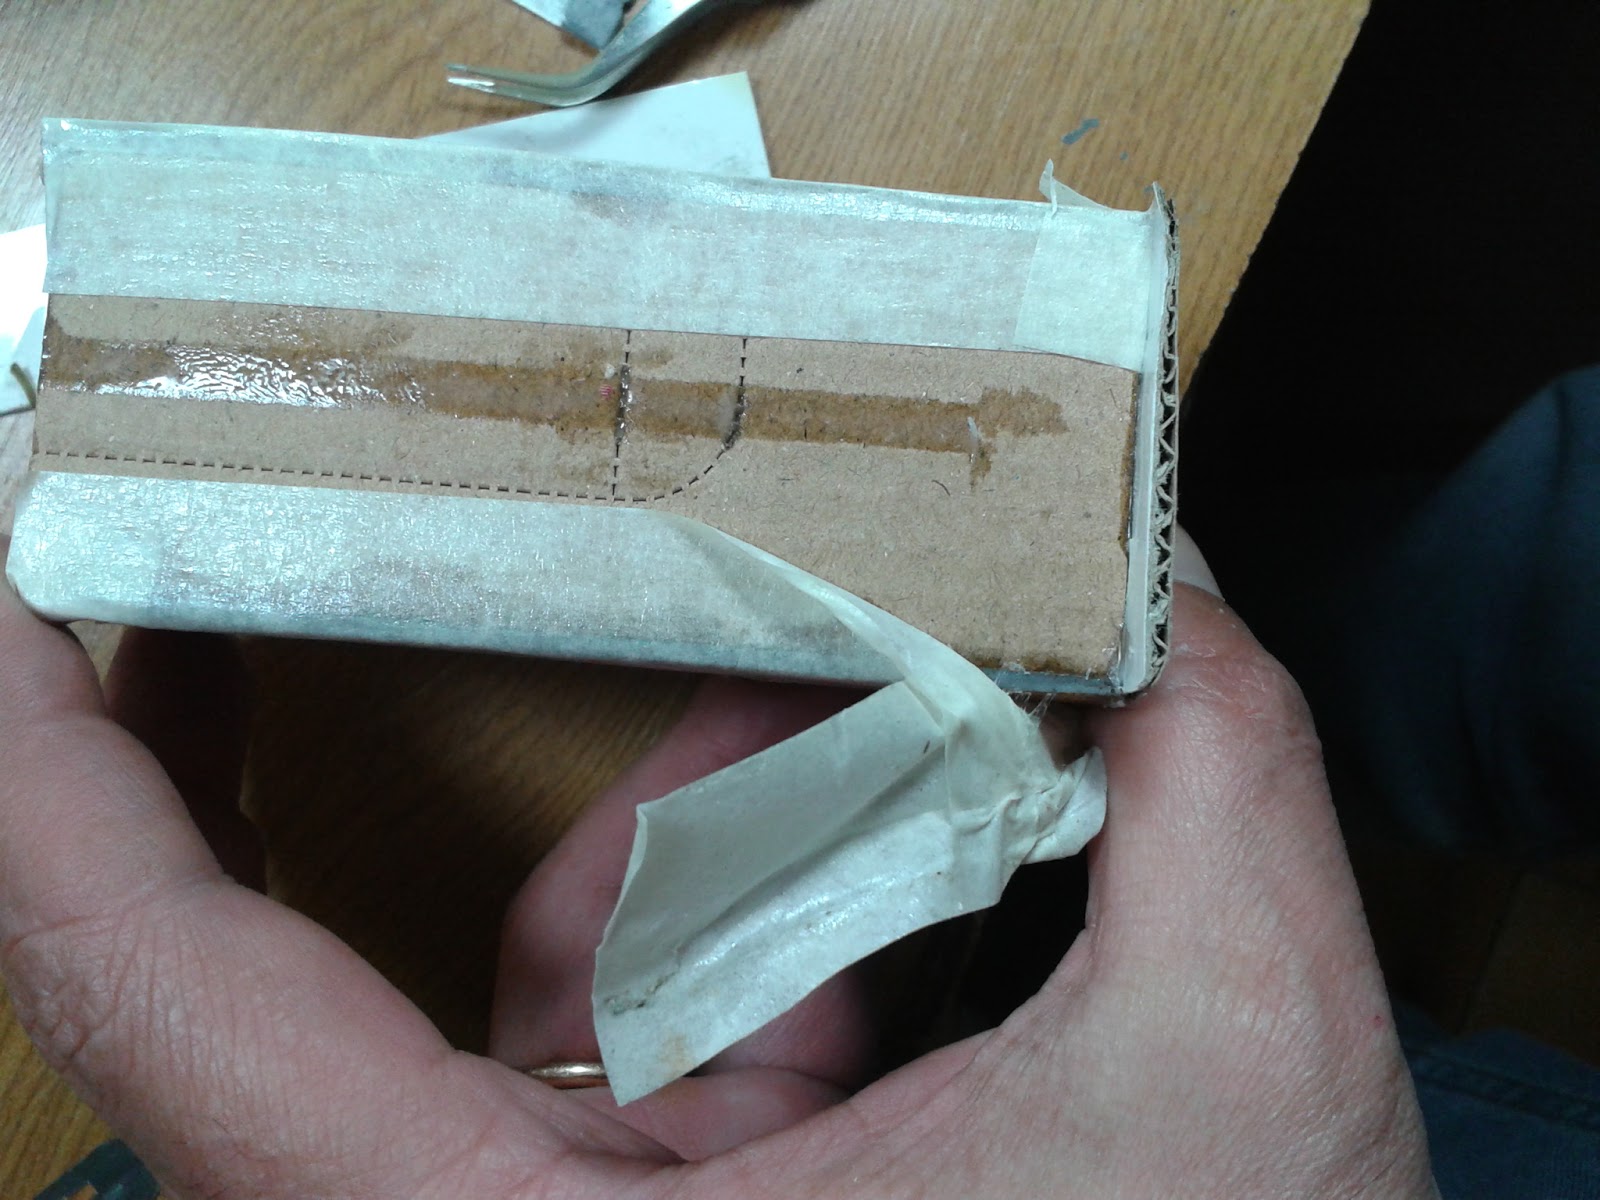
3) Tapo los huecos de los guardabarros y cualquier abertura que tenga el vehículo con cinta de papel para pintor de modo de formar una copa cerrada.


4) Relleno con plastilina los huecos que puedan quedar y donde se pueda meter la silicona y trabar el desmolde.


5) Rodeo por dentro toda la circunferencia del vehículo con cinta de papel para pintor alargando o haciendo mas profunda la copa.


6) Corto tiras de cartón (tipo cartón de cigarrillos) de 3 a 5 mm y la pego al la cinta de papel por fuera de la copa, rodeando todo el vehículo.


7) Aletas. Esto es importante, mas adelante veremos para que. Lo que hago es rodear al modelo con cinta de papel de manera que quede horizontal al vehiculo. Esta aletas deben rodear al vehiculo en 5 mm en los laterales y la parte de atras y la dejamos mas larga en el frente (1,5 a 2 cm).


8) Soportes. En la parte posterior del vehiculo, pego a la parte de cartón de la copa (no sobre el metal del vehículo sino sobre el cartón ) dos o tres piezas de plástico que me servirán para adherir el modelo a la base de la caja donde hare molde, ya que para esto se debe moldear el vehiculo en posicion vertical, con el frente hacia arriba.


II) LA CAJA


1) Apoyo el vehiculo sobre un cartón, esta vez mas grueso (caja de zapatos o mas grueso) y marco las medidas para cortar el carton y hacer las paredes de la caja. Es importante que las medidas del las paredes exedan en 2 mm a las aletas en el ancho y 20 mm en el largo en el frente del autito.


2) Pego cinta de pintor en los laterales de los cartones y junto los cuatro cartones, de manera que la parte impermeable del carton (si la tuviera) quede hacia dentro y asi se monta la caja. Si es posible cerrare la caja por dentro, en las uniones, con mas cinta para pintor para impermeabilizar mas el molde y evitar fugas de silicona mejor.


3) Luego pego con cianocrilato el vehiculo desde los soportes traseros de plástico a un pedazo de carton (la medida no importa) que sera la base de la caja. El vehiculo queda en posición vertical con la parte anterior hacia arriba.


4) Opcional. Cubro el interiror de la caja y la base SIN TOCAR EL MODELO con vaselina solida (no es estrictamente necesario, se puede evitar, pero si lo hacemos nos facilitara las cosas mas adelante).
5) Luego pongo la caja cubriendo el vehiculo y égo la caja a la base con cianocrilato y luego para estar seguro impermeabilizo rodeando esta costura con mas cinta para pintor.


Y asi queda el vehiculo, con sus aletas de cinta papel horizontales encerrado en su caja.
Ok, hasta aqui esto parece complicado, pero si se sigue la receta se puede hacer rapido, a mi me llevo solo 30 minutos, desde que separe las partes del autito, considerando que estaba ademas tomando mates y escuchando los comentarios de mi mujer que estaba mirando una serie de television creo que es poco tiempo.
III) SILICONA Y AGUARRAS
Proporciones.
Para lo que sea que utilice de silicona en gramos, agrego un 30% en gramos de aguarras MINERAL desodorizada. En peso.
Como ejemplo.
Para 100 g de silicona seran 30 g de aguaras.
Para 150 g de silicona seran 49, 5 de aguarras.
OJO, ESE PESO EN AGUARRAS EN VOLUMEN SON CERCA DE 50 ML. Por eso, para el aguarrás mejor no usar jeringas sino vasos.
SIEMPRE HAY QUE PESAR PREVIAMENTE LOS RECIPIENTES, JERINGAS Y VASOS QUE UTILIZAREMOS Y ANOTAR SU PESO ANTES DE COMENZAR EL TRABAJO. Y LUEGO AL PESO DE LOS RECIPIENTES SUMARLE EL PESO DE SILICONA O AGUARRAS.
SIEMPRE HAY QUE PESAR PREVIAMENTE LOS RECIPIENTES, JERINGAS Y VASOS QUE UTILIZAREMOS Y ANOTAR SU PESO ANTES DE COMENZAR EL TRABAJO. Y LUEGO AL PESO DE LOS RECIPIENTES SUMARLE EL PESO DE SILICONA O AGUARRAS.


1) Calculamos la cantidad de silicona que se necesitara.
Esto se puede hacer cargando agua dentro de la caja hasta taparla, luego vuelco el agua en un vaso y mido su volumen que y asi se cual sera el volumen de silicona que necesitare,cargo la silicona en el vaso hasta ese volumen de silicona y lo peso.
Cargo la silicona hasta el volulen marcado, lo peso, le resto el peso del recipiente y sabre cuanto peso (gramos) de silicona tengo, para calcuular luego el porcentaje de acelerador y el del aguarras.
La facil..."a ojo" para un autito normal (un camion o un vehiculo mas grande ya seria otra cosa) y si hemos respetado las medidas de la caja cargamos 150 gramos de silicona en el recipiente. Seguramente ha de sobrar, en general, para mis moldes con 100 gramos de silicona suele acanzar. Pero para estar seguros y hasta que cada uno adquiera la practica y la experiencia sugiero 150 g de silicona, que serian luego adichionarle 49,5 g de aguarras mineral.
2) Mezclo la silicona con su acelerador segun las proporciones que nos da el fabricante (en mi caso es 3% de peso de acelerador), una vez echa esta mezcla, agrego el aguarras mineral desodorizada (30% del peso de la silicona) mezclo bien y un buen rato hasta tener una mezcla homogenea.


3) Vuelco la silicona dentro de la caja. No hacerlo de un golpe sino de a poco, primero hasta la luneta trasera, sacudiendo un poco para que las burbujas salgan a la superficie , luego un poco mas hasta el parabrisas, sacudo de nuevo para que las burbujas salgan a la superficie, luego hasta cubrir apenas la parrilla y sacudo de nuevo para que las burbujas salgan a la superficie y finalmente lleno toda la caja.
La aleta de papel del frente del autito debe sobresalir de la silicona.
La aleta de papel del frente del autito debe sobresalir de la silicona.


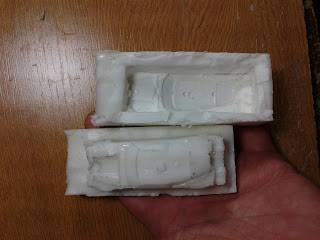
Desmoldando
Cuando la silicona esta seca (apoyo el dedo y veo que esta dura y elastica) comienzo el desmolde que pasa simplemente por cortar el papel de una union de la caja de carton y retiro el cubo de silicona de una sola pieza.


Abriendo el molde
Identifico la aleta de cinta de papel que sobresale del frente del auto.

y luego con un cutter o un bisturi comienzo a cortar los bordes de silicona siguiendo la guia de las aletas de papel hasta separar el molde en dos partes. Una la parte que cubre el vehiculo y la segunda la parte que rellena el vehiculo por dentro.


y luego con un cutter o un bisturi comienzo a cortar los bordes de silicona siguiendo la guia de las aletas de papel hasta separar el molde en dos partes. Una la parte que cubre el vehiculo y la segunda la parte que rellena el vehiculo por dentro.


Luego retiro el vehiculo y limpio dentro del molde los pedacitos de papel, carton o plastilina que pudieran haber quedado.


Midiendo el molde para saber cuando ha llegado a la escala.
Una vez echo y abierto el molde, el aguarras se ira evaporando y el molde se ira reduciendo, se puede reducir hasta un 20 o 30% en varios dias, 10 dias despues el molde puede continuar reduciendose.
Si dejamos reducir el molde totalmente para ponerla resina, nuestro autito en vez de 1/72 podria ser de 1/80 o mas chico.
La velocidad en que se reduce el molde no es constante, solo se puede calcular estimativamente.
De modo que debemos cargar la resina cuando nuestro molde se ha reducido al tamaño exacto.
Muy sencillo, vamos midiendo la distancia entre ejes de nuestro molde (ok, nuestro molde no tiene ejes, pero podemos estimarlo midiendo en la mitad del relieve de los guardabarros) y cuando la distancia entre ejes llega a la medida exacta para 1/72 volcamos la resina,
Recordemos cuando hice las mediciones del vehiculo, la distancia entre ejes daba 43 mm, bueno, voy midiendo la disantcia entre ejes en el relieve de los guardabarros del molde con frecuencia y cuando es de 43 mm, cargola resina.
En algunos Moldes he tenido que esperar hasta 10 dias para estar en la medida y en otros solo en 24 horas ya estuvo en la medida.


En algunos Moldes he tenido que esperar hasta 10 dias para estar en la medida y en otros solo en 24 horas ya estuvo en la medida.


Con la misma temperatura ambiente he visto moldes reducirse a 1/72 en 24 hs y otros tardar hasta 16 dias.
Es simple.
Primeto mezclamos la resina segun las recomendaciones del fabricante.
En mi caso es una resina poliuretanica A+B en proporcion 1:1 en volumen de curado rapido (20 minutos)
Cuando volcamos la resina, tiene que ser en cantidad suficiente como para cubrir el capot del auto en el molde.


I used to think that making silicone molds and resin reproductions was somewhat complicated and I avoided experimenting with the technique, until I read from some friends that with this way you could reduce larger figures and vehicles to 1/72 scale or smaller.
I was always attracted to the idea of being able to make civilian vehicles, especially automobiles, but on the scale where I work 1/72 these kits are few.
The brands that make cars, they make them in general in 1/64 (or approximate) and since they are metal it is difficult to work with them.
So the idea of being able to transform a car from metal to resin, which is a materail easier to work siumilar to plastic, and being able to reduce it from 1/64 to 1/72 could with my prejudices on silicone and resin and I decided to experiment.
The first thing I found was that working with these materials is really easy and simple, to the point that my first mold and my first reproduction went well !!! In addition, the method is really economical if we consider that with a single mold we can make many reproductions of the same vehicle.

IV) RESINA
Es simple.
Primeto mezclamos la resina segun las recomendaciones del fabricante.
En mi caso es una resina poliuretanica A+B en proporcion 1:1 en volumen de curado rapido (20 minutos)
La resina se vuelca en la cara del molde que cubre el exterior hasta cubrir el relieve del capot y luego apoyo sin hacer mucha presión la cara del molde que rellena el interiror del vehiculo.
Vere que la resina en exceso comienza a salir de dentro del molde, solo la dejo chorrear.
Vere que la resina en exceso comienza a salir de dentro del molde, solo la dejo chorrear.
Cuando volcamos la resina, tiene que ser en cantidad suficiente como para cubrir el capot del auto en el molde.


Luego, sencillamente apoyo la tapa del molde y la presiono un poco y cierro el molde.
Vere que el exceso de resina chorrea por los bordes, solo lo dejo escurrir.


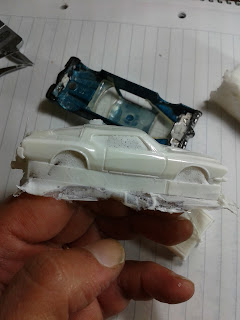
Cuando la resina esta seca, despego con cuidado la tapa del molde y la retiro.
La reproducción queda dentro.


Luego retiro la reproduccion.


Elimino las rebarbas


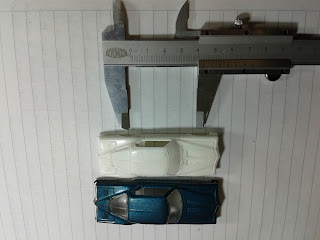
Comparacion de tamaño con el vehiculo original y mediciones


La distancia entre ejes, segun los calculos hechos al principio tenia que ser de 43 mm, y he tenido la suerte de conseguirlo.
Ahora tengo un autito en 1/72.


Sugiero hacer varias copias, una que vamos a armar y otra para guardar y nos sirva para hacer mas copias (esta vez sin tener que achicar el molde) en el futuro.

Como guardo el molde.
Consegui hacer el molde y retirar la copia del auto justo cuando se habia reducido a 1/72...pero el molde continuara reduciéndose hasta que toda el aguarras se haya evaporado y si lo dejo, el molde ya no podre volver a usarlo porque la reproduccion sera muy pequeña.
Si hago un molde, y lo dejao dentro, en 1/72, quizas solo quizas, el molde se ira retrayendo pero la reproducción que deje dentro conservara el tamaño y asi quizas, solo quizas, podre volver a utilizar el molde en el futuro.
De otro modo si quieros hacer mas reproducciones tendre que usar alguna de las copias ya reducidas que he hecho.
Durante el experimento hice varios autitos, auqnue cada cual requierio un tiempo para cargar la resina diferente (en algunos cargue la resina en solo 24 horas y en otros a la semana) ...todos quedaron bien.

Parece complicado pero es una boludez.
Las ruedas
Existen varias marcas de autos en 1/64 que traen buenas ruedas e interiores.
Reproducirlas y reducirlas es mas sencillo que con los autos, ya que con un molde de una sola cara es suficiente.
Solo armo una caja con una base de plasitilina, coloco las ruedas o el interior , hago la mezcla de silicona y aguarras. desmoldamos y esperamos que se encoja.


algunos otros ejemplos
PLYMOUTH GTX


PONTIAC FIREBIRD TRANS AM


PICK UP FORD 54- F100


PICK UP CHEVROLET 62


PONTIAC FIREBIRD 69


ENGLISH
I apologize for the bad translation, Im not a english spiker o writer.
I did what I could.
I used to think that making silicone molds and resin reproductions was somewhat complicated and I avoided experimenting with the technique, until I read from some friends that with this way you could reduce larger figures and vehicles to 1/72 scale or smaller.
I was always attracted to the idea of being able to make civilian vehicles, especially automobiles, but on the scale where I work 1/72 these kits are few.
The brands that make cars, they make them in general in 1/64 (or approximate) and since they are metal it is difficult to work with them.
So the idea of being able to transform a car from metal to resin, which is a materail easier to work siumilar to plastic, and being able to reduce it from 1/64 to 1/72 could with my prejudices on silicone and resin and I decided to experiment.
The first thing I found was that working with these materials is really easy and simple, to the point that my first mold and my first reproduction went well !!! In addition, the method is really economical if we consider that with a single mold we can make many reproductions of the same vehicle.

TECHNIQUE The theory of how to proportionally reduce a silicone mold is very simple, if I mix the silicone with its accelerator and then I add some liquid and volatile substance that can be mixed with the silicone, by setting the silicone and putting the hard mold, the substance volatile will evaporate and the mold will be reduced. These volatile substances are solvents and fuels, especially minerals. Experts recommend benzine (which is used for lighters) and mineral spirits. For a question of having easier access and decided to use mineral spirit deodorized , which can be purchased at any paint store.
Experience, if you want to avoid delays, don't tell your wife you are going to the paint store, or she will take profit to make you paint the home fences or any thing at home
Experience, if you want to avoid delays, don't tell your wife you are going to the paint store, or she will take profit to make you paint the home fences or any thing at home

ELEMENTS THAT ARE NEEDED
1) Silicone of hardness 20 and catalyst.
2) Polyurethane resin. The epoxy resin (the classic transparent glass called "liquid crystal" is not recommended because it takes a long time to heal and because of its high viscosity leaves many bubbles).
3)Mineral spirit, deodorized
4) Small and economical electronic scale that measures in grams (I got mine in a store that sells electronic and cellular things two blocks from my house), pay for it 250 Argentine pesos.
5) Three 10 cc disposable syringes.
One for the silicone catalyst and two for mixing the two parts of the resin.6) Three glasses or disposable containers and if possible one measuring and resistant to turpentine (the so-called extravasation glasses used for cooking are useful).
7) Painter's paper tape.
8) Plasticine
9) Carton (any semi-permeable cardboard, a shoe box, cigarettes etc)
10) Scissors or cutter
11) Cyanicrilato
12) A rule or preferably a millimeter caliper for measurement.
13) Latex gloves.
1) Silicone of hardness 20 and catalyst.
2) Polyurethane resin. The epoxy resin (the classic transparent glass called "liquid crystal" is not recommended because it takes a long time to heal and because of its high viscosity leaves many bubbles).
3)Mineral spirit, deodorized
4) Small and economical electronic scale that measures in grams (I got mine in a store that sells electronic and cellular things two blocks from my house), pay for it 250 Argentine pesos.
5) Three 10 cc disposable syringes.
One for the silicone catalyst and two for mixing the two parts of the resin.6) Three glasses or disposable containers and if possible one measuring and resistant to turpentine (the so-called extravasation glasses used for cooking are useful).
7) Painter's paper tape.
8) Plasticine
9) Carton (any semi-permeable cardboard, a shoe box, cigarettes etc)
10) Scissors or cutter
11) Cyanicrilato
12) A rule or preferably a millimeter caliper for measurement.
STEPS
I) MASTERPIECE
II) BOX
III) SILICONE AND MINERAL SPIRIT
IV) RESIN
I) MASTERPIECE
IV) RESIN
I) MASTERPIECE
This is the most annoying part of the project.
Measurements
First we choose the car we want to scale to resin. In this case I chose a little car from the Hotwheels brand of the many that my son abandoned when he left childhood.
It is important to make some measurements.
First you have to know the real measurements of the car, these are easily found on the internet. In this case it's a Buick Riviera Silver Arrow from 72. The measures to take into account are, length, width and distance between axes (Wheelbase) . For a matter of comfort and to make things easier I will only choose the wheelbase.
Buick Riveira Silver Arrow 1972 wheelbase: 3099 mm
With this we calculate what would be the measure of our vehicle in 1/72.
So 3099/72 : 43 mm.
The Buick Riveira Silver Arrow 1972 wheelbase in 1/72 is 43 mm.
It means that when our mold has a wheelbase of 43 mm we should dump the resin.
Preparing the vehicle to make the mold.
a) The chassis, where the wheels go.
b) The carcass where the windshield and the rear window are included.
c) The interior with the seats .
What we want to reproduce is the carcass (b)
Then
What we want to reproduce is the carcass (b)
Then
1) Separate the chassis from the car (the best way is to remove the rivets, either with a wick, a screwdriver or the dremmel)
2) Some parts (occasionally the front with the grill or the rear part with the lights or fenders) may be part of the chassis and not the carcass, so we must cut it with a fine saw and then stick to the carcass with cyanoacrylate .
If the plastic that forms the windshield is not well attached to the carcass we should also fix it with cyano.
3) Cover the holes of the fenders and any opening like windows with paper tape for painter so as to form a closed cup.
If the plastic that forms the windshield is not well attached to the carcass we should also fix it with cyano.
5) Surround the entire circumference of the vehicle with paper tape for painter lengthening or deepening the cup.
6) Cut strips of cardboard (cardboard carton) of 3 to 5 mm and stick to the paper tape outside the cup, surrounding the entire vehicle.
7) Wings.
This is important, we will see later on what.
What we do is to surround our model with paper tape so that it is horizontal to the vehicle. These fins should surround the vehicle in 5 mm on the sides and the back and leave it longer in the front (1.5 to 2 cm).
8) Supports. In the back of the vehicle, stick to the cardboard part of the cup (not on the metal of the vehicle but on the cardboard we attach) two or three pieces of plastic that will serve to attach the model to the base of the box where we will make mold, since for this the vehicle must be molded in a vertical position with the front of the vehicle facing upwards.
II) BOX
this timecarboard more thicker (shoe box or thicker) and make the walls of the box. It is important that the measurements of the walls exceed 2 mm to the wings in the width and 20 mm in the length in teh front of the car.
2) We stick painter's tape on the sides of the cartons and join the four cartons, sowe have the box. If it is possible to close the box inside in the joints with more tape for painter to waterproof more the mold and prevent silicone leakage, better.
3) Then we paste with cyanoacrylate the vehicle from the rear plastic supports to a piece of cardboard (the measurement does not matter) that will be the base of the box. The vehicle remains in a vertical position with the front part facing up.
4) Optional: We cover the interiror of the box and the base WITHOUT TOUCHING THE MODEL with solid Vaseline (it is not strictly necessary, it can be avoided, but if we do it, it will make things easier for us later on).
5) Then cover the vehicle with the box and adhere the box to the base with cyanoacrylate and then to be sure we waterproofed around with more tape for painter.
And so we have the vehicle, with its horizontal paper tape wings or flaps enclosed in its box. Ok, so far this seems complicated, but if we follow the recipe it can be done quickly, it took me only 30 minutes, considering that I was also drinkig some "mates" and listening to the comments of my wife who was watching a television series, I think it's a short time.
III) SILIONE & MINERAL SPIRIT
Proportions
For whatever we use of silicone in grams, we add 30% in grams of deodorized mineral spirits.
As an example. For 100 g of silicone will be 30 g of mineral spirit.
For 150 g of silicone will be 49, 5 grams of mineral spirit.
ATTENTION THAT WEIGHT IN MINERAL SPIRIT IN VOLUME ARE CLOSE TO 50 CC.
For that reason, better to use cups and not siringes.
As an example. For 100 g of silicone will be 30 g of mineral spirit.
For 150 g of silicone will be 49, 5 grams of mineral spirit.
ATTENTION THAT WEIGHT IN MINERAL SPIRIT IN VOLUME ARE CLOSE TO 50 CC.
For that reason, better to use cups and not siringes.
WE ALWAYS HAVE TO WEIGH THE CONTAINERS, SYRINGES AND CUPS THAT WE WILL USE, EMPTY, AND THEN WE SCRAPE THEIR WEIGHTS ON A PAPER.
This is because what we put in silicone, accelerator or mineral spirit , we must add or subtract the weigh from their containers.
This can be done by loading water into the box until it is covered, then pouring the water into a glass and measuring its volume so that it will be the volume of silicone that I need, I charge the silicone in the glass to that volume of silicone and weight.
Then rest of the weight of the container and know how much weight (grams) of silicone is, to then calculate the percentage of accelerator and that of mineral spirit.
The easy ... "to eye" for a normal car (a truck or a larger vehicle would be something diferent) and if we have respected the measures for the box, we load 150 grams of silicone in the container. Surely it has to be left, in general, for my molds with 100 grams of silicone usually attain. But to be sure and until everyone acquires the practice and experience I suggest 150 g of silicone, which would need 49.5 g of mineral spirits.
3) Dump the silicone inside the box. Do not do it with a blow but slowly, first up to the rear window, shaking a little so that the bubbles come to the surface, then we dump a little more to the windshield, shake a little so that the bubbles come to the surface, then until barely cover the grill and shake again so that the bubbles come to the surface and finally fill the entire box.
The paper wing on the front of the car should protrude from the silicone.
The paper wing on the front of the car should protrude from the silicone.
When the silicone is cured (we support the finger and we see that it is hard and elastic and we can see in the silicone that we will probably have remained in the container that is dry) we started the demolding, that happens simply by cutting the border of the carton box and removing the bucket from one piece silicone.
We identify the paper tape flap that protrudes from the front of the car.
IV) RESIN
The problem here is WHENto pour the resin.
Once the mold is cast and opened, the mineral sírit will evaporate and the mold will be reduced, it can be reduced up to 20 or 30% this in several days, 10 days later the mold can continue to be reduced.
If we let reduce the mold completely to put resin, our car instead of 1/72 could be 1/80 or smaller. The speed at which the mold is reduced is not constant, it can only be calculated estimatively.
So we must load the resin when our mold has been reduced to the exact size, wich for our car was 43 mm wheelbase.
Very simple, we have to measure the distance between axes of our mold (ok, our mold has no axes, but we can estimate it measuring in the middle of the relief of the mudguards) everyday and when the wheelbase reaches the exact measurement for 1/72 (43 mm) we dump the resin.
So remember when we made the measurements of our vehicle?, the distance between axes gave us 43 mm, well, we are choosing the wheelbase in the relief of the fender of our mold and measure frequently and when it is 43 mm, we drop the resin.
With the same ambient temperature I have seen molds reduced to 1/72 in 24 hours and others take up to 16 days.
Then we mix the resin according to the manufacturer's recommendations. In my case it is a polyurethane resin A + B in a 1: 1 ratio by volume of quick curing (20 minutes)
When we drip the resin, it has to be in sufficient quantity to cover the hood of the car in the mold.
When the resin is dry, we carefully take off the top of the mold and remove it.
Now we have a car in 1/72.
I suggest making several copies, at that moment. Because the mold will continue to shrink.
At least two copies one that we are going to assemble and another one to save and that will help us to make more copies (this time without having to reduce the mold) in the future.
If we make a mold, and leave it inside, in 1/72, maybe, just maybe, the mold will be retracting but the copy that we left inside will keep the size and so maybe, just maybe, we will be able to use the mold again in the future.
Otherwise, if we want to make more reproductions we will have to use some of the already reduced copies that we have made and make a regular mold without mineral spirit .
During the experiment I made several cars, although each one required a time to load of resin different (in some of them the resin was loaded in only 24 hours and in others a week) ... they all looked good.
ANOTHER EXAMPLES
PLYMOUTH GTX

FORD PICK UP 54 -F100
PONTIAC FIREBIRD TRANS AM
PICK UP CHEVROLET 62
PONTIAC FIREBIRD 69
WHEELS & INTERIORS
There are several brands of cars in 1/64 that bring good wheels and interiors.
Reproducing them in resin and reducing them is easier than with cars, since a single-sided mold is enough.
We only assemble a box with a base of plasitiline, place the wheels, make the silicone mixture with mineral spirit, demold and wait it be shrinked.
Reproducing them in resin and reducing them is easier than with cars, since a single-sided mold is enough.
We only assemble a box with a base of plasitiline, place the wheels, make the silicone mixture with mineral spirit, demold and wait it be shrinked.


EJEMPLOS
Pontiac Firebird


Ford Truck


Plymouth GTO


Fabulous work, very appreciated
ReplyDeletemany thanks .
ReplyDeleteWow excelente tutorial !!!! me encantaria probarlo. En donde conseguiste la resina ?? Soy de Argentina tambien.
ReplyDelete¡Excelente tutorial, gracias! ¿Que rsina poliuretánica utilizás, Purcast? y ¿Donde la comprás?
ReplyDeleteThis comment has been removed by the author.
ReplyDeletetanto la silicona como la resina se consiguen en Mercado libre. la busqueda es, "silicona para moldes" dureza 20 o rtv 20. Para la resina l busqueda es "resina poliuretanica 20 minutos o 40 minutos". misma en mercado libre pueden preguntarle a los vendedores "esta silicona me sirve para moldes pequeños y con mucho detlle para volcar resina?" o preguntas similares y siempre contestan bien.
ReplyDeleteThis is an amazing technique with a lot of potential. Thanks for writing a great tutorial!
ReplyDeleteThanks EY
DeleteThis comment has been removed by the author.
ReplyDeleteFabulous explanation. Thank you so much for taking the time to create this demonstration. It is one of the best I have ever come across for ANY process. broken down into exactly the right details at each stage. Brilliant.
ReplyDelete